In
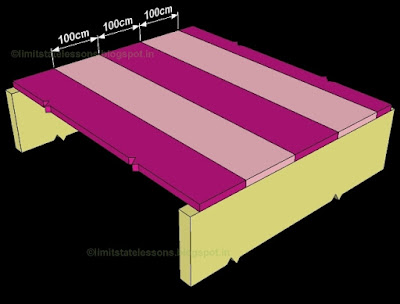
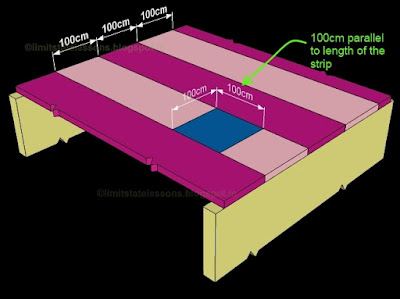
the previous section we completed the analysis of one way slabs. Now we will see the design process. As in the case of beams, here also, we will first see the procedure for fixing up the 'preliminary dimensions'. We have seen that for analysis and design, the slabs are considered as strips, and we can take any one strip. As we are dealing with 1m wide strips, the width of the beams that we have to design is fixed at 1000mm. We have to fix up only the preliminary depth. Let us see how this is done:
We know that the depth provided to a beam must be sufficient for it to resist the bending moment acting on it. In addition to this, the depth must be sufficient to control the deflection also. So the depth depends on two criteria:
• To resist the bending moment, and
• To control deflection.
In the case of slabs, where the depth is relatively low, the criterion for deflection control becomes more critical. That is., a slab with a certain depth may effectively resist the bending moment acting on it. But this same depth may not be sufficient to control the deflection. In other words, the slab generally requires more depth to control it's deflection than it requires to resist bending.
So to fix up the preliminary depth, we must use the deflection control criterion. Let us take the case of a simply supported slab (whose effective span is less than 10m). We have already discussed the procedure for deflection control here. The effective depth that the slab actually have in the final structure should satisfy the following relation:
(l/d)actual ≤ [(l/d)basic] α kt - - - (1)
• For simply supported spans, (l/d)basic = 20
• As we are considering spans less than 10m, α need not be taken into account.
Thus we get :
(l/d)actual ≤ 20 x kt - - - (2)
From this expression, we want to calculate 'd'. But kt is also an unknown. So we assume a value for kt. The assumed value should be as accurate as possible. For this we look at the numerous design examples of simply supported slabs that are done in the past by different designers. By examining them, we can find that the percentage of reinforcement pt generally falls in the range 0.4–0.5.
Sample calculation:
Let a slab have the following properties:
D =150mm; d =115mm; Ф =10mm; s =150mm
Then from Eq.5.2,
= 490.87mm2. So pt = 100Ast /bd = [490.87 x100]/[1000 x115] = 0.427
Based on this information, we adopt the following procedure:
• Assume that the area of steel provided is equal to the area of steel required,
• Then fst will be equal to 0.58fy.
Take the value of fy that is going to be used. If it is 415, then fst = 240.7
So we have the values required to find kt: They are:
(a) pt in the range 0.4–0.5, and
(b) fst = 240.7
Corresponding to these values, we will get kt = 1.25 from Fig.4 of the code.
So substituting in (2) we get
6.1: (l/d)actual ≤ 20 x 1.25 ⇒ (l/d)actual ≤ 25. So d that we actually provide in the final slab should be greater than or equal to l/25. This is for simply supported slabs.
For continuous slabs, we can write:
6.2: (l/d)actual ≤ 26 x 1.25 ⇒ (l/d)actual ≤ 32.5. So d that we actually provide in the final slab should be greater than or equal to l/32.5.≈ l/32
From the above expressions, what we get is the effective depth d. To this we must add Cc and half of Ф to get the total depth D. Ф can be assumed to be equal to 10mm.
As in the case of beams, we must do all the design checks to ensure that the final section satisfies all requirements. If the section fails to do so, the whole process should be repeated with improved dimensions.
So we have fixed the preliminary dimensions. The next step is to find the effective depth required from bending moment considerations. Once this is calculated, we must compare it with the d that we have from the preliminary depth. If the required value is less, we can proceed to find the steel required to resist this bending moment. These two steps are same as that for a beam.
Now we must know the 'rules' for distributing the calculated steel into the slab.
Concrete cover and grade of concrete:
The details about the concrete cover that has to be provided to the bars of a slab are same as those of a beam. They were discussed in the section about the design of beams, and we saw table 4.1.
So, if we are to design a slab which will be subjected to 'moderate' exposure conditions, from table 4.1,we get the value of Cc to be provided as 30 mm , and the minimum grade of concrete to be used as M25
Minimum spacing to be provided between the bars of a slab:
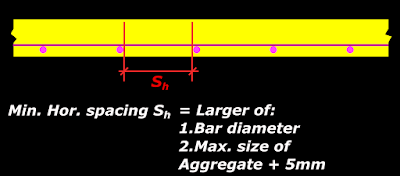
The clear space provided between parallel reinforcing bars should not be less than the minimum value specified in cl 26.3.2 of the code. We have seen the details of this clause when we discussed about the minimum spacing between bars of beams here. The same is applicable to slabs also. So we can show the application of this clause to slabs as shown in the fig.6.1 below:
Fig.6.1
Minimum spacing between bars of slab
Maximum spacing allowable between bars of a slab:
When we design the slab we will get the area of steel that should be provided. Sometimes, when we convert it into 'spacing of bars of a particular diameter', we may get a large spacing s. This often happens when the bending moment that the slab has to resist, is low. Large values of s may be obtained on other occasions also: When we choose to provide large diameter bars. This can be explained as follows: From 5.3 we know that
In the above equation, for the same value of Ast, we will get a larger s for a larger Ф.
It may seem to be economical to provide bars at large spacing. But bars at large spacing will not be able to control cracks effectively. Also the bond between steel and concrete will become lesser when bars are at a large distance apart.
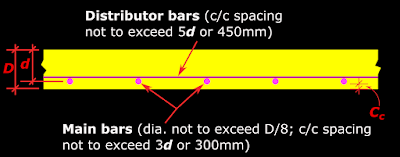
So the code specifies some upper limits to the spacing. The c/c spacing provided between parallel reinforcing bars of a slab should not be greater than that specified in cl 26.3.3 (b) of the code. The requirements stated in this clause can be shown as in fig 6.2 given below:
Fig.6.2
Maximum spacing between bars of slab
In the above fig., it is indicated that the diameter of the main bars should not exceed D/8. This is because 'small diameter bars spaced closer together' is effective in reducing cracks and in improving bond than 'large diameter bars spaced at larger distances'. However, bars smaller than 8mm in diameter are generally not used as main bars of slabs.
Minimum Area of reinforcement for slabs:
The area of reinforcement provided in slabs should not be less than that specified in cl 26.5.2 of the code. The requirements stated in this clause can be written as follows:
6.3: For Fe 250 steel:
Ast ≮ 0.0015Ag
6.4: For Fe 415 steel:
Ast ≮ 0.0012Ag
Where Ast is the area of steel provided in the slab, and Ag is the gross area of cross section of the slab. Ag is equal to bD where b is the width of the slab and D is the total depth of the slab. When we consider a strip of slab for the design, b is equal to the width of the strip.
Transverse reinforcement for one way slabs :
We have seen in the previous chapter that transverse reinforcement is required for one-way slabs. These bars are also called distribution bars of a One-way slab. The quantity of this reinforcement that we have to provide, is given by the code, and is same as that given by 6.3 and 6.4 above.
The c/c spacing between the distribution bars should not exceed the smallest of the following (cl 26.3.3.b (2)):
• 5 times the effective depth d of the slab
• 450 mm
This is shown in fig. 6.1 above
Deflection control for one-way slabs
We have seen some details about deflection control checks in one way slabs when we discussed about the 'preliminary depth' at the beginning of this chapter. There we assumed a value for pt. But now we are discussing the actual 'check'. This is the 'last but one check' that we have to perform after the design of a one way slab (The last one being the check for MuR). So here we will be using the actual pt that is provided. The procedure is same as that for a singly reinforced beam. So we can write the same expressions that we wrote for the beam:
4.19
For singly reinforced rectangular slabs with span less than 10m,
(l/d)actual ≤ [(l/d)basic] kt
4.20
For singly reinforced rectangular slabs with span greater than 10m,
(l/d)actual ≤ [(l/d)basic] α kt
Partial fixity at supports:
Another topic that we must consider, is the design at supports. If the slab is simply supported, the bending moment will be zero at the supports. The details to be considered in such a situation is demonstrated in the following presentation:
(The first five slides are same as the ones we saw in an earlier presentation about the behaviour of slabs in chapter 5)
This completes the discussion about the design of a simply supported one way slab. We will now see a solved example which demonstrates the actual process of design.
Solved example 6.1
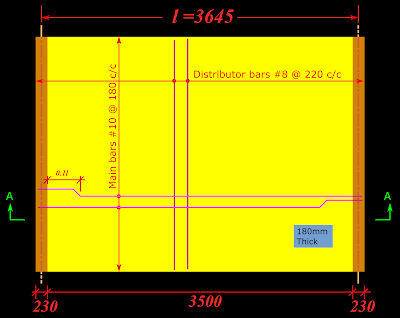
In the above solved example, we have determined the reinforcement requirements of a simply supported one way slab. Based on that design we must draw a plan and a sectional view, showing the layout of bars. This is given in the fig.6.3 and 6.4 below:
Fig.6.3
Plan view showing reinforcement details of slab
Fig.6.4
Sectional elevation
In the plan view, we can see that alternate bars are bent up at supports. The reason for this can be explained as follows: We have designed the slab as 'simply supported'. So the bending moments at the support will be equal to zero. But if in the future, partial fixity (shown in the presentation above) is introduced at any of the supports, bending moments will develop at that support. These bending moments will be hogging in nature. So tension will develop near the top surface of the slab at such supports. Thus we have to provide top steel. This can be achieved by bending up the bars. The requirements for this top reinforcement is given by cl.D-1.6 of the code. According to this clause, the bars must extend a distance of 0.1l from the support into the slab. Also, these bars should have an area equal to 50% of that provided at midspan. Thus, when we bend up alternate bars, we will get 50% at the top.
Technically, we need to show only two bars of a particular set. But if we show more bars, the symmetry and pattern will become more clear. Such a plan view is given here.
In the sectional view in fig.6.4 above, the two bars are shown separately only for clarity. The two bars are in fact provided in the same layer as indicated by the '0'mm dimension.
This completes the design and detailing of a 'simply supported' one way slab. Next we will see 'continuous' beams and one way slabs. But to analyse continuous beams and slabs, we must know how to calculate the 'effective spans' in continuous members. So in the next chapter we will see the details about this effective span also.

