Wednesday, May 27, 2020

Chap 17 (cont..1)

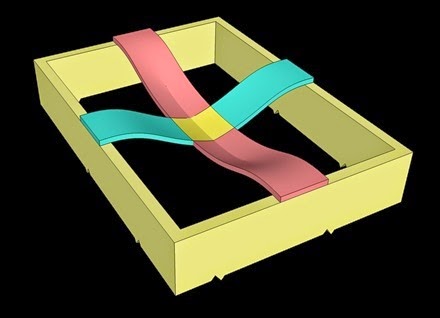
Let us consider the red strip first. The red strip is the longer strip, parallel to ly, and having effective span ly. From 17.1 in the previous section, the share of load acting on it is wy. So the deflection of the yellow portion can be written as:
delta_y
Similarly, the deflection of the yellow portion while considering the blue strip can be written as:
delta_x
As the deflection of the yellow portion is same for both the strips, we can equate the above two as shown below:
delta_x_y
From this, we get a simple relation between wx and wy:
Eq.17.2:
wx_wy_l_4
Based on the above relation, we can infer that wx will be always greater than wy, because the ratio ly/lx will always be greater than 1. We know that wx is the share that makes the cylinder whose axis is perpendicular to lx. So this is the load that gets transferred to the long walls. So we can say that the load transferred to the long walls is greater than the load transferred to the short walls.
If we add the two shares, we will get the total load w acting on the slab. That is:
Eq.17.3:
wx_wy_w
From Eqs.17.2 and 17.3 we will get
Eq.17.4:
Where r = ly / lx
Steps leading to the derivation can be seen here
wx and wy are the UDL acting per one meter square area on the slab. The width of the strips that we are considering is 1m. So wx and wy will be the load acting per one meter length of the strips. When we know the load per meter length on the strip, we can calculate the maximum bending moment on that strip. Thus we can write:
Eq.17.5:
We must understand one more concept at this stage. wx and wy are loads per one square meter area, and they are the shares transferred in particular directions. So all the strips parallel to a particular direction will be experiencing the same load per one square meter area. That is., all the strips parallel to lx will be experiencing wx per unit area. And all the strips parallel to ly will be experiencing wy per unit area. So we can say that each of the strips parallel to lx will experience a maximum bending moment of wx lx2/8. And each of the strips parallel to ly will experience a maximum bending moment of wy ly2/8.  So, the above Eq.17.5 which we derived based on a single strip is applicable to the whole slab.
Again, as mentioned before, in an actual two way slab, the load on each strip will be different from the adjacent strip. So the bending moment experienced by each strip will also be different from the adjacent strip. But we are assuming that all the strips in a particular set have the same load and bending moment. This assumption is for the ease of analysis. It will give conservative results for this type of a simply supported two way slab.
Now we will proceed to calculate the actual quantities in Eq.17.5. For this we must substitute for wx and wy from Eq.17.4. Thus we get:
Eq.17.6:
We can write the above equation in a form that is given in the code:
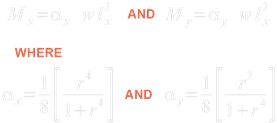
In the above Eq.17.7, we must take a special note of the expression for My. We can see that it is given in terms of lx, the smaller span. Also compare the expression for αy with that of My in Eq.17.6. The numerator has become r2 instead of 1.
We can make an important inference from Eq.17.7. The difference between Mx and My is αx and αy. The other quantities w and lx2 are the same. Now, αx has r4 in the numerator while αy has r2. The denominators are the same. As r will always be greater than 1, r4 will always be greater than r2. So αx will be greater than αy. Thus Mx will always be greater than My. So the steel required to resist Mx should be in the bottom most layer. This will give more effective depth, and thus greater Moment of resistance to the section. From 17.1, we know that Mx is acting parallel to lx. So we can write:
17.8:
The steel calculated from Mx is to be laid parallel to lx, and it should be in the bottom most layer.
Eq.17.7 is the final form given in cl.D-1.1 of the code. So we will follow it. The detailed steps leading to it’s derivation can be seen here.
The values of αx and αy are given in the table 27 of the code. A sample calculation can be done as follows:
Let r = ly/lx = 1.3. Then αx = r4 / 1 + r4 = 0.0926 and αy = r2 / 1+ r4 = 0.0548 The same values given in the table 27.
For using this table, first we must calculate r = ly/lx. then we take the value of αx and αy from the table. If r is an intermediate value, we can use linear interpolation. If we are using a computer, we can use Eq.17.7 directly. There is no need to obtain values from the table, and do the interpolation.
So each of the strip parallel to lx will experience a maximum bending moment of αxw lx2. And each of the strip parallel to ly will experience a maximum bending moment of αyw ly2 . Now the situation has become similar to a simple one way slab. In the case of a one way slab, we divide it into a number of strips. Then we find the maximum bending moment in any one strip, and the steel for resisting this BM is applicable to all the strips. The same happens in two way slab also. Only difference is that, we have to do the design two times, one for each direction. From the chart 17.1, Mx is bending the slab into a cylinder whose axis is perpendicular to lx. So we provide the steel required to resist Mx in a direction parallel to lx, as if to straighten the cylinder back to a plane surface. Similarly, we provide the steel required to resist My in a direction parallel to ly.
So now we have the equations for calculating the bending moments in a simply supported two way slab. But to use them, we need to find the load w. For this, we want to know the thickness of the slab to calculate the self wt.  Also, we want the values of the effective spans lx and ly. In the next section we will see how these quantities are determined.

PREVIOUS      CONTENTS   NEXT

             Copyright ©2015 limitstatelessons.blogspot.com - All Rights Reserved
Monday, May 25, 2020

Chapter 17 (cont..2) Thickness and Effective span of Two way slabs

Preliminary value for the thickness of a two way slab
When fixing the thickness of slab, deflection criterion is more important than the bending moment criterion. That is., a lower value of thickness may be sufficient to resist the bending moment. But that lower value will not satisfy the deflection check. So we will do the procedure for deflection check in a sort of 'reverse' manner to fix up a preliminary value for 'D', the total thickness of the slab. This can be done as follows:
We know that, for spans less than 10m, to satisfy the deflection check, the following condition should be satisfied:
  - - - - (1)
For simply supported members, (l/d)basic = 20.
Now we take kt. This can be calculated by using the expression given in SP24:
  - - - - (2)
Where
fs_1  - - - - (3)
But in the above expressions, there are three unknowns. (a) pt, (b) Area of steel required, and (c) Area of steel provided. These three unknowns can be solved by making some assumptions:
From the numerous design problems of One way slabs that has been already done for various buildings and other structures, we can say that the percentage of reinforcement is around 0.45% when Fe415 steel is used. Note that this is for one way slabs. If we assume that the area of steel required is same as the area of steel provided, then from (3):
fs = 0.58 x 415 x 1 = 240.7 N/mm2 - - - - (4)
Substituting this value of fs and pt (= .45) in (2) we get kt = 1.277
Effective spans of a two way slab
Now, to use the l/d ratio, we must have the value for l. For a two way slab, we have two values for l. They are lx and ly. It is the value of lx, (cl.24.1, Note 1) the shorter side that we have to use in the l/d calculation. But the percentage of steel required for resisting Mx in a two way slab is less than the percentage of steel (0.45%) required to resist the moment in a one way slab with the same effective span as lx. Because of this lower value of pt, kt will be higher than 1.277.
It may be noted that instead of using (2) we can use fig.4 of the code. From that fig., it can be seen that when pt decreases, kt increases.
So we use a value of kt = 1.5
Substituting this in (1) we get lx/d provided ≤ 20 x 1.5.
So we get:
Eq.17.9:

lx/d provided ≤ 30

OR d provided ≥ lx/30
However, the design using this value should be finalized only after the checks using actual area of steel required and the actual area of steel provided.
There is another method to fix up the total depth D of a two way slab. But to use this method, the slab should satisfy the following conditions:
• lx is less than or equal to 3.5m, and
• LL is less than or equal to 3kN/m2,
When the above two conditions are satisfied, we can use cl.24.1-Note 2 of the code for calculating the total depth D of the two way slab:
Eq.17.10: 
Fe250 steel:
D ≥ lx/35 for simply supported slabs
D ≥ lx/40 for continuous slabs
For Fe415 steel, 35 and 40 can be multiplied by 0.8. Thus:
For Fe415 steel :
D ≥ lx/28 for simply supported slabs
D ≥ lx/32 for continuous slabs
If the conditions are satisfied, and if D is calculated using the above method, then according to this clause, we do not need to do deflection checks after the design.
So we now know the method to fix up the preliminary value for the total depth or effective depth of a two way slab. For this method, we need to know the value of lx. But fixing up the value of lx itself needs a trial and error method:
We know that the effective span of a simply supported beam or slab is equal to the lesser of the following two items: Details here
• Clear span plus effective depth
• c/c distance between the supports 
         - - - - (5)
But we are trying to determine the effective depth. It is a fraction of the effective span. And the effective span can be computed only if the effective depth is known. This forms a loop. So here we do a trial and error method:
(a) Take the clear shorter span (mm)
(b) Add 150 mm to it. (The average value of the effective depths of slabs with different spans generally seen in practice is around 150 mm)
(c) Find the lesser of {the above sum; c/c distance between supports}.Assume this lesser value to be lx. Use any one of the three equations as appropriate to find d:
▪ For Fe415, d provided ≥lx/30 (Eq.17.9)
▪ For Fe250, D ≥ lx/35 for simply supported slabs (Eq.17.10)
▪ For Fe415, D ≥ lx/28 for simply supported slabs (Eq.17.10)
(d) Round off the value of d, by assuming the diameter of bars and clear cover.
(e) Use this in (5) to calculate lx
We will do a sample calculation to illustrate the above steps:
The shorter clear span of a simply supported two way slab is 3700 mm, and the longer clear span is 4500 mm. The slab is supported on 230 mm thick brick masonry walls all around. Determine lx, ly, dx and dy.
Solution:
(a) Clear shorter span = 3700mm. So c/c distance between supports = 3930mm.
(b) 3700 + 150 = 3850 mm
(c) lesser of {3850;3930} = 3850. So d provided should be greater than or equal to 3850/30 = 128.33 (Eq.17.9)

(d) Assume 10 mm diameter bars at a clear cover of 20 mm. Then total depth D = 128.33 +5 +20 = 153.33mm. Let us provide D = 155mm. Then dx = 155 -20 -5 = 130mm. dy = 155 -20 -10 -5 = 120 mm.

e) Short direction:
▪ clear span + effective depth = 3700 + 130 = 3830 mm
▪ c/c distance between the supports = 3700 +230 = 3930 mm
So lx = lesser of the above = 3830 mm
Long direction:
clear span + effective depth = 4500 + 120 = 4620 mm
c/c distance between the supports = 4500 +230 = 4730 mm
So lx = lesser of the above = 4620 mm
We will do one more sample calculation with smaller spans:
The shorter clear span of a simply supported two way slab is 3250 mm, and the longer clear span is 3450 mm. The slab is supported on 230 mm thick brick masonry walls all around. Maximum LL on the slab is 2.5 kN/m2. Determine lx, ly, dx and dy.
Solution:
(a) Clear shorter span = 3250mm. So c/c distance between supports = 3250 +230 =3480mm
(b) 3250 + 150 = 3400 mm
(c) Lesser of {3400;3480} = 3400. D provided should be greater than or equal to 3400/28 = 121.43 (Eq.17.10)
(d) Let us provide D = 125 mm. Assume 8 mm diameter bars at a clear cover of 20 mm. Then dx = 125 -20 -4 = 101 mm. dy = 125 -20 -8 -4 = 93 mm.
(e) Short direction:
▪ clear span + effective depth = 3250 + 101 = 3351 mm
▪ c/c distance between the supports = 3250 +230 = 3480 mm
So lx = lesser of the above = 3351 mm
Long direction:
▪ clear span + effective depth = 3450 + 93 = 3543 mm
▪ c/c distance between the supports = 3450 +230 = 3680 mm
So lx = lesser of the above = 3543 mm
So we are now in a position to determine the Total depth and effective spans. Knowing the total depth, we can determine the self wt. of the slab:
Eq.17.11:
Self wt. per square meter area of the slab = 1 x 1 x D x 25 = 25D kN/m2.
We add this to the self wt. of finishes and the LL. (Both will be given in wt. per unit area). The sum of the three items will be w, the total load acting on the slab.
Knowing w, lx and ly, we can determine Mx and My using Eq.17.7. And thus the analysis of the slab will be complete.
In the next section, we will discuss the procedure to check whether the section of a two way slab can resist the one way shear applied on it.

PREVIOUS      CONTENTS       NEXT

             Copyright ©2015 limitstatelessons.blogspot.com - All Rights Reserved
Chapter 17 (cont..4)- Torsionally restrained two way slabs

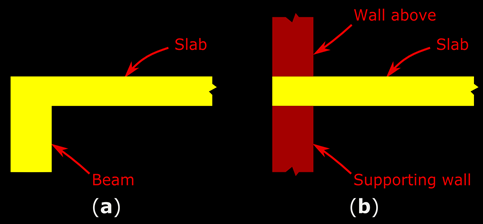
In the previous sections, we discussed about the analysis and design of Simply supported two way slabs. The method of analysis that we used is called the Rankine-Grashoff method. The values of αx and αy that are given in the table 27 of the code are known as the Rankine-Grashoff coefficients. Simply supported two way slabs are usually designed using this method. But there are other types of two-way slabs which are not simply supported. For example, the two-way slab may be continuous over one or more supports. Fig.17.1 that we saw earlier is the plan view of such an example. Another example is when the two-way slab is built monolithically into a supporting beam. Fig.17.10(a) below shows the sectional view of such an example. Yet another example is when a wall is present above the supporting wall as shown in the sectional view in fig.17.10(b). In these cases, the corners of the slab are not free to lift up, and so, Rankine-Grashoff theory is not applicable.
Fig.17.10
Examples of restraints applied at supportsWhen there is a restraint at the supports, the corners of the two way slab are not able to lift up.
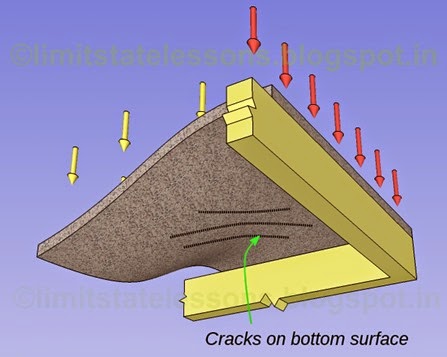
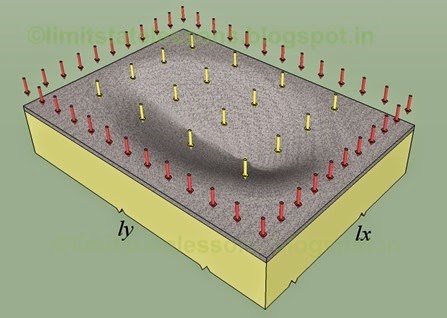
Fig.17.11 below shows the view of a two way slab. The yellow arrows represent the uniformly distributed load acting on the slab. The red arrows represent the restraining force acting at the supports. This view is only a schematic representation. The restraining force may be due to a wall built above the support, or the slab being built monolithically into a beam, or the slab being continuous. In any case, a restraining force is acting at the supports of the slab, and so the corners are being prevented from lifting up. When such a restraint is applied to a slab subjected to uniformly distributed load, it deforms into the shape of a 'dish'.
Fig.17.11
View of a two way slab whose corners are held down
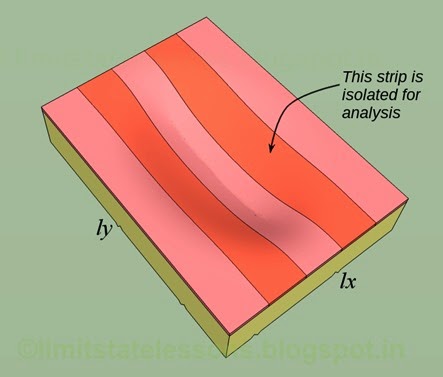
Let us divide the slab into strips. The fig.17.12 below shows the slab divided into a set of strips parallel to ly.
Fig.17.12
Strips parallel to ly
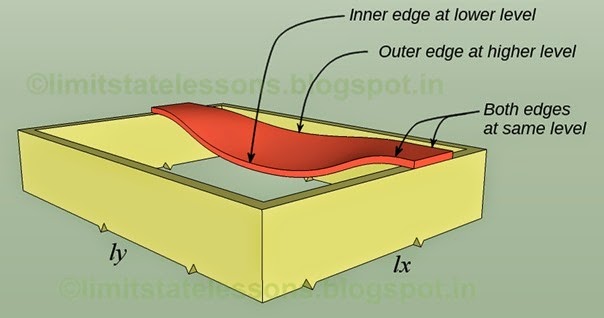
Let us take one particular strip from this set. The second one from the longer support. It is shown in the fig.17.13 below:
Fig.17.13
Analysis of a single strip
Torsion experienced by a strip in a two way slab
We can see that, at the middle portion of the strip, the inner edge is at a lower level than the outer edge. And towards the ends of the strip, both the edges are at the same level. So the strip is twisted. In other words, the strip is experiencing torsion. This torsional effect is more towards the ends of the strip. When we take the whole set of red strips, the strips nearer to the two long walls experience this torsion to a greater extent than the strips near the middle of the whole slab. In the same way, in the other set of blue strips which are perpendicular to the red strips, the torsional effect will be more at the ends of those blue strips which are nearer to the short walls. So when we take the slab as a whole, we can see that the torsional effect will be more pronounced at the four corners of the slab.
Thus we can see that the slab is resisting the external loads applied on it, not only by bending, but also by torsion. But we have to provide special steel reinforcement to resist this torsion. Let us now see how this steel is to be provided:
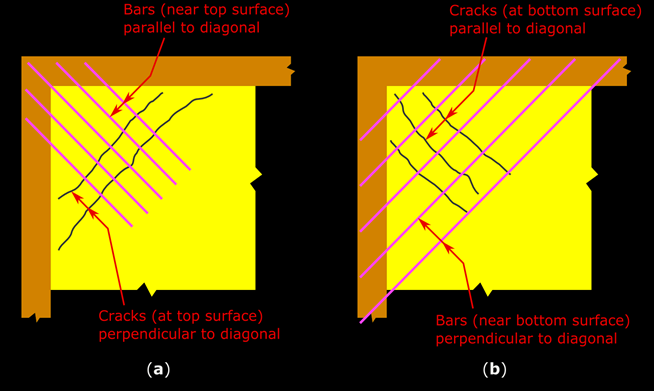
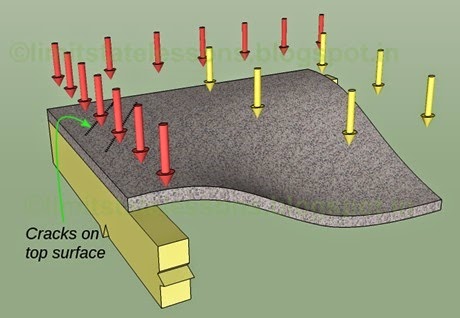
Fig.17.14 below shows a corner of the slab separated from the rest. We can see that, due to the restraining effect, cracks will be formed on the top surface of the slab. These cracks are in a direction perpendicular to the diagonal of the slab.
Fig.17.14
Top surface at corner portion
At the corner of a restrained two way slab, cracks will be formed at the top surface, and the direction of these cracks will be perpendicular to the diagonal of the slab
We have to provide steel reinforcement at the top of the slab so that these cracks are intercepted. This means that we have to provide steel bars in a direction parallel to the diagonal of the slab. This is shown in the plan view given below in fig.17.16(a)
Now we will see the under side of the slab. That is., the bottom surface. This is shown in the fig.17.15 below:
Fig.17.15
Bottom surface at corner portion
At the corner of a restrained two way slab, cracks will be formed at the bottom surface, and the direction of these cracks will be parallel to the diagonal of the slab.
At the bottom surface, cracks will be formed in a direction parallel to the diagonal of the slab. So here we have to provide steel bars in a direction perpendicular to the diagonal of the slab so that these cracks are intercepted. This is shown in the fig.17.16(b) below:
Fig.17.16
Arrangement of corner bars
Corner bars are provided to prevent potential cracks at the corners of restrained two way slabs.
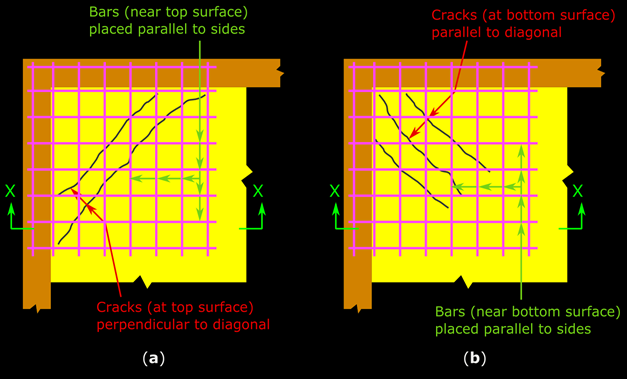
There is another method to provide these corner bars. In this method bars are not provided parallel or perpendicular to the diagonal. Instead, they are provided parallel to the sides of the slab. This is shown in the fig.17.17 below:
Fig.17.17
Alternative arrangement for corner bars
Corner bars in two orthogonal directions at top and bottom can prevent the formation of cracks at the corners of restrained two way slabs.
From the fig.17.17(a), we can see that near the top surface, there are two sets of bars. One set consists of bars parallel to lx and the other set consists of bars parallel to ly. These two sets are provided in two layers. The bottom layer is just below the top layer. Both these sets act together to prevent the formation of the cracks at the top surface.
Similarly (fig.17.17(b)), near the bottom surface also, there are two sets of bars. One set consists of bars parallel to lx and the other set consists of bars parallel to ly. These two sets are provided in two layers. The top layer is just above the bottom layer. Both these sets act together to prevent the formation of the cracks at the bottom surface. Thus there will be a total of 4 layers.
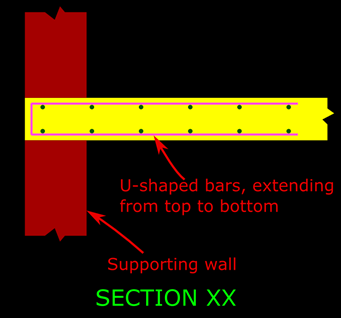
It is better to provide 'U' shaped bars (section XX in fig.17.18) so that all the bars at the corners will act as a single unit, and also chances of displacement of the bars at the time of pouring concrete is minimum.
Fig.17.18
U-shaped bars at corner
In later sections, we will see the length required for these corner bars, and also the diameter and spacing.
In the next section we will discuss the methods for obtaining the bending moments in a restrained two way slab.

PREVIOUS      CONTENTS       NEXT

             Copyright ©2015 limitstatelessons.blogspot.com - All Rights Reserved
Chap 17 (cont..5)-Coefficients for Bending moments in restrained two way slabs

Now we will discuss how to determine the bending moment in each of the directions X and Y in a restrained two way slab. For this, let us consider the middle strip in each direction as shown below.
Fig.17.19
Middle strips in restrained two way slabs
Middle strips of the slab can be analysed to calculate the bending moments in the restrained two way slabs. But various corrections have to be applied to them.
Note that this fig. is different from the earlier fig.17.5 that we saw for a simply supported two-way slab. Because, here the ends of the strips are restrained or in other words tied down to the supports.
As in the case of simply supported slab we saw before, we can determine the maximum bending moments at the center portion of each of these restrained strips also. Let us denote them as Mx and My. If we use the factored loads, we will get the factored bending moments, and from those we can determine the steel required in each direction. But the bending moments that we obtain at the center portion of these restrained strips require some corrections to be applied to them. So we will call them Mx,1 and My,1 at this stage. The subscript '1' indicates that they are the first values in each direction, before applying any corrections. We will change this subscript as we proceed with the application of the various corrections.
Now we will discuss the first correction that has to be applied: The values Mx,1 and My,1 are obtained by considering the action of individual strips. But a slab consists of several such strips, and there will be interaction between adjacent strips. Consider a square slab subjected to uniformly distributed load of w/m2. As it is square, the load share in each direction will be the same and is equal to w/2. So the maximum bending moment at the center of each strip will be
But if we analyse a square elastic plate subjected to uniformly distributed loads, by using the 'theory of bending of elastic plates', we will find that the maximum bending moment at it's center will be 0.048wl2. This is lesser than 0.0625wl2. This is because, when we analyse a plate as a whole, the interaction between the strips will also be taken into account, and so we will get a lesser value. So we have to apply a correction to Mx,1 and My,1. We will later see how this correction can be applied while designing a slab. In the mean time we will call the corrected value as Mx,2 and My,2.
Let us now discuss the next correction that has to be applied: Mx,1 and My,1 are the maximum bending moments at the center portion of the strips. These strips are like individual beams. If we increase the loads on the strips, a point will be reached where the steel at the center portion in the strips will begin to yield. If the load is increased further, the strips will fail. But in an actual two way slab, when the steel in the center portion fail, the failure of the slab as a whole will not occur. This is because the steel in the surrounding portion, will be able to take up the load. If the load is increased further, this surrounding steel will also fail. This continues until the steel fails at a considerable area in the center of the slab. So we can see that we need not provide steel for Mx1 and My1, as the failure of the slab will not occur even if they are exceeded. Thus we have to apply a correction here also. Let us denote the values obtained after applying both the above two corrections as Mx,3 and My,3.
The last correction that has to be applied is related to the torsion reinforcement that we saw in fig.17.17. In restrained slabs we have to provide these bars at the corners to prevent cracks. In such slabs which have adequate reinforcement for torsion, the bending moments at the center portion will be lesser than Mx1 and My1. Because the slab is resisting the load not only by bending, but also by torsion. The corner reinforcements have the effect of reducing the deflection and curvature at the center portion of the slab. This can be further explained based on the view in fig.17.20 below:
Fig.17.20
Interaction between perpendicular strips
A strip in a restrained two way slab has the ability to reduce the deflection of a perpendicular strip, by means of torsion.
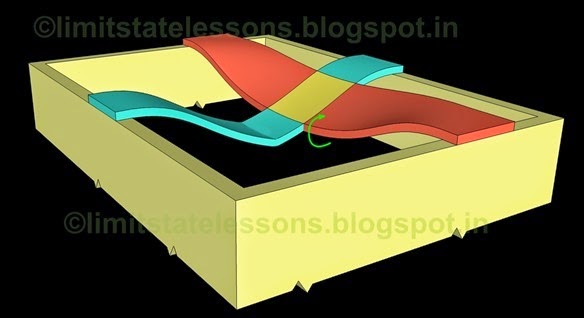
The red strip in the above fig. is the same one which we saw earlier in fig.17.13 The blue strip is the middle strip in the perpendicular set of strips which are parallel to the short side. The red strip is under torsion. So torsional moments are induced in the red strip. These torsional moments try to twist the strip back to it's original shape. This is shown by the green arrow. Thus the torsional moment will reduce the deflection of the blue strip. This type of interaction between perpendicular strips will occur on the entire area of the slab.
So we have to apply a correction for this also. When this above correction is also applied, we can denote the values as Mx,4 and My,4. But now, all the required corrections are applied and we no longer need to use the subscripts 1,2 etc., and so we will denote the final values as Mx and My. , and the factored values will be denoted as Mu,x and Mu,y.
We have seen the various corrections that have to be applied. But we have not seen the methods for applying them. In design practice, these corrections are not applied separately. We use some 'Moment coefficients' αx and αy. These are similar to the Rankine-Grashoff coefficients that we saw in the case of simply supported two-way slabs. When we use these coefficients, the resulting bending moments will be the required final values Mx and My, with all the necessary corrections applied.
Mx = αx w lx2 and
My = αy w lx2
If we use factored load wu in the above equations, we will get the factored bending moments as shown below:
Mu,x = αx wu lx2 and
Mu,y = αy wu lx2
Note that both the bending moments are in terms of the shorter side lx
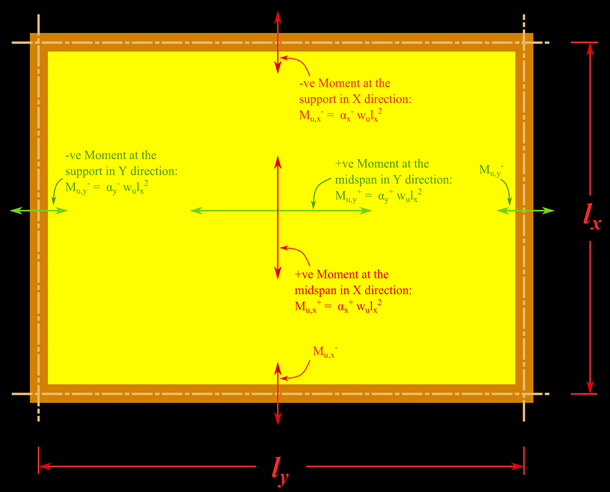
When there is fixity or continuity at any of the four supports of the slab, hogging (negative) moments will occur at those supports. So we need separate coefficients for those negative moments also. Thus we will need four coefficients: αx+, αx-, αy+ and αy-. The fig.17.21 shows the application of the four coefficients:
Fig.17.21
Four coefficients for bending moments
Four coefficients for bending moments are available in the case of restrained two way slabs.
In the next section we will see some basic background details before we obtain the actual four coefficients.

PREVIOUS      CONTENTS       NEXT

             Copyright ©2015 limitstatelessons.blogspot.com- All Rights Reserved

Chapter 17 (cont..6)- Combinations of edge supports in restrained two way slabs

In the case of simply supported two-way slabs, we used two center strips in perpendicular directions for the derivation of the Rankine-Grashoff coefficients. In a similar way, we can use the two center strips shown in fig.17.19 in the previous section, to determine the coefficients for restrained two-way slabs. In the fig.17.19, we have a central red strip (the long strip) and a central blue strip (the short strip). Both these strips have their ends tied down to the support. To determine the coefficients, first we find the general form of the maximum bending moments in the two strips, considering them as independent beams. Then we analyse the various corrections to be applied, and determine the general form for those corrections. Finally, we obtain the general form for the coefficients for the bending moments. The coefficients so obtained will be applicable to any slab which has all the four edges tied down to the support. That means, if those coefficients are to be applicable to a slab, each of it's four sides should be either continuous, or built into a beam, or there should be a wall above the supporting wall.
But what if we have a slab which has one edge, say one short edge, simply supported? If one short edge is simply supported, then one end of the red strip will be simply supported. In that case, the process of analysis will be different. So we have to do the whole process again to obtain the general form of the coefficients. Those coefficients will be applicable to any slab which has one short edge simply supported, and all other edges fixed or continuous.
Again, the coefficients mentioned just above will not be applicable to a slab with one long edge simply supported, and all other edges fixed/continuous. In this case, one end of the blue strip will be simply supported, and all other ends will be fixed. We have to do the whole process again and find the general form of the coefficients. These coefficients will be applicable to any slab with one long edge simply supported and all other edges fixed/continuous.
There are several combinations possible:
[One long edge and one short edge simply supported and the other two edges fixed/continuous], [Two long edges and one short edge simply supported and the other edge fixed/continuous], etc., are some of the possible combinations. Let us find out the number of all the possible combinations and their details.
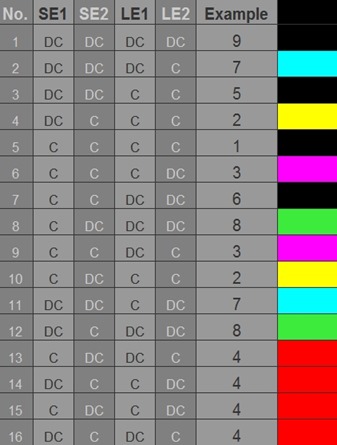
We will use the term 'Discontinuous' (short form: DC) edge to denote a simply supported edge. A fixed/continuous edge will be denoted as 'Continuous' (short form:C) edge. There will be two short edges in a slab and they will be denoted as SE1 and SE2. The long edges will be denoted as LE1 and LE2. Now we can form a table given below which shows all the possible combinations.
Table 17.1
Possible combinations of edges
Possible combinations of edges in a two way slab
We can see that there are 16 possible combinations. Let us see the details of any one sample row in the above Table, and see it's details. Take the combination No.3. It has both the short edges discontinuous, and both the long edges continuous. We have to cite an example of such a slab in a real building. For this we look at the fig.17.22 given below:
Fig.17.22
Examples of different combinations
Plans showing the slabs with different combinations of edge supports in restrained two way slabs
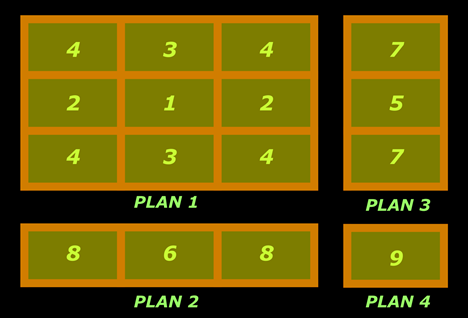
It shows four floor plans. Plan 1 is the plan of a building with nine rooms. Plan 2 and plan 3 are those of buildings with 3 rooms. Plan 4 is that of a building with a single room. The combination that we are considering now, has two short edges discontinuous and two long edges continuous. Such a slab can be seen in plan 3. The middle panel which is marked as 5, belongs to this category. So 5 is entered in the 'Example' column of the Table, in the row for combination No.3.
Let us see one more example. Take combination No.6. It has two short edges and one long edge continuous, and the remaining long edge discontinuous. Such a slab panel can be seen in Plan 1. The panels marked as 3 belongs to this category. So 3 is entered in the 'Example' column of the Table, in the row for combination No.6.
We are considering square or rectangular slabs in our present discussion about two-way slabs. So opposite sides will be equal. That is., SE1 = SE2 and LE1 = LE2. So when we make all the possible combinations, there will be some duplications. For example, the combination with one short edge and one long edge C and the other Short edge and Long edge DC can have four possible combinations, all of them giving the same result of panel 4. This is indicated by the four red blocks in the Table. As the four combinations give the same result, we need to consider only one, and the rest three can be discarded. Similarly there are four more cases, indicated by the green, yellow, cyan and magenta colors. Each have two combinations which give the same results. We need to take one only from each. Thus the net number of combinations = 16 -3 -1 -1 -1 -1 = 16 -7 = 9. We will modify the Table by avoiding duplications and thus showing only the nine cases. We will also change the order so that they are in the same order as given in the code. This modified table is given below:
Table 17.2
Modified Table showing the nine combinations
Table showing the nine combinations of edge supports in a restrained two way slab
It may be noted that the numbering of the panels in fig.17.22 above was done based on the order of the cases given in the code. That is how we get sequential order in the ‘Example’ column in the above Table 17.2.
In the next section we will obtain the actual values of the coefficients for each of the above nine combinations.

PREVIOUS      CONTENTS       NEXT

  
             Copyright ©2015 limitstatelessons.blogspot.com - All Rights Reserved
Chapter 17 (cont..7)- Coefficients from code for bending moments in two way slabs

So we have seen the nine different possibilities. As we saw before based on fig.17.21, we need four coefficients for any slab panel. So there can be nine sets of coefficients, with each set having four unique coefficients. So in general, there will be a total of 9 x 4 = 36 coefficients. If we are given a two-way slab panel, depending on it's position in the building, and also depending on it's edge supports, it can fall into any of the nine categories. We must be able to determine the appropriate 4 coefficients for the given slab, from among these 36.
At the discontinuous (ie., simply supported) edges, the negative moments will be zero. So, with out any calculations, we can say that the coefficients for the negative moments at such supports will be equal to zero. (This is because, in the equation Mu,x = α wu lx2 = 0, wu and lx cannot be zero. So the only option is that the coefficient α is equal to zero.) Thus some of the coefficients among these 36 will be zero. We will see more details about it later.
We can derive expressions for calculating these coefficients. The derivations are based on the ‘classical theory of plates’. In this method, the slabs are considered as plates. In the derivation, the various corrections that we saw before are taken into account. There will be variables in these expressions by which we can 'input' the type of support at each edge (whether simply supported or fixed/continuous). By giving the appropriate value for the variables, we can obtain any of the 36 coefficients.
Another method is to use the 'Approximate solutions' based on Rankine-Grashoff theory. Corrections to these solutions were proposed by Marcus. This is known as the 'Marcus correction'.
Even as there are different methods such as those mentioned above, we must use the method (Cl. D-1) given by the code. In the Table 26, the values of the coefficients are given directly. The coefficients in this Table are based on 'Yield line analysis'. We do not have to learn the derivation of these coefficients at this stage. Their values are sufficient for carrying out an analysis and design of the slabs.
Let us now see a sample from the Table 26. Suppose that we want to design a slab in which
• both the short edges are continuous
• one long edge is continuous and
• one long edge is discontinuous.
Mentioning all the above three boundary conditions together is equivalent to mentioning just the last one only:
• one long edge is discontinuous.
With the mention of this last condition, the other two are automatically implied.
This slab falls under the category of panel 3 in fig.17.22. This is case no.3 of Table 26. Let ly/lx of our slab be equal to 1.2. So from the Table, we have
• Coefficient for the Negative moment (in the X direction) at the continuous edge (column 5 of Table 26) = αx- = 0.052
• Coefficient for the Positive moment (in the X direction) at the midspan (column 5) = αx+ = 0.039
• Coefficient for the Negative moment (in the Y direction) at the continuous edge (column 11) = αy- = 0.037
• Coefficient for the Positive moment (in the y direction) at the midspan (column 11) = αy+ = 0.028
We must note one point here: If the value of ly/lx falls between 1.2 and 1.3 (say 1.23 , 1.27 etc.,), then we must use linear interpolation to find αx- and αx+ . But no interpolation is required for αy- and αy+ . This is because, for case 3, whatever be the value of ly /lx, the code gives constant values of 0.037 and 0.028 for αy- and αy+. In fact, each of the nine cases has it’s own constant values for αy- and αy+ (column 11), which do not change with the value of ly/lx.
The application of the four coefficients are shown in the fig.17.23 below:
Fig.17.23
Bending moments in the slab
Bending moments in a two way restrained slab using code coefficients
Let us consider one more sample. Suppose that we want to design a slab in which
• both the short edges are continuous
• both the long edges are discontinuous
Mentioning the above two boundary conditions together is equivalent to mentioning just the last one only:
• both the long edges are discontinuous
This slab falls under the category of panel 6 in fig.17.22. This is case no.6 of Table 26. Let ly/lx of our slab be equal to 1.3. So from the table, we have
• Coefficient for the Negative moment (in the X direction) at the continuous edge (column 6):
Here we do not find any value. Why is this so? This can be explained based on the fig.17.24 below:
Fig.17.24
Bending moments in the slab
Perpendicular to the X direction, both the supports (the longer supports) are discontinuous. In other words simply supported. So the bending moment at those supports will be zero. This means that the coefficient will be equal to zero. If any one of these longer supports were continuous, the coefficient would have been present.
• Coefficient for the Positive moment (in the X direction) at the midspan (column 6) = αx+ = 0.057
• Coefficient for the Negative moment (in the Y direction) at the continuous edge (column 11) = αy- = 0.045
• Coefficient for the Positive moment (in the y direction) at the midspan (column 11) = αy+ = 0.035
As mentioned earlier we must note one point here also: If the value of ly/lx falls between 1.2 and 1.3 (say 1.23 , 1.27 etc.,), then we must use linear interpolation to find αx- and αx+ . But no interpolation is required for αy- and αy+ . This is because, for case 6, whatever be the value of ly /lx, the code gives constant values of 0.045 and 0.035 for αy- and αy+. As mentioned above, each of the nine cases has it’s own constant values for αy- and αy+ (column 11), which do not change with the value of ly/lx.
If we look at any of the columns from (3) to (10), we can see that for cases 6 and 8, there are no coefficients for negative moment at supports in the X direction. Similarly in column (11), we can see that for cases 5 and 7, there are no coefficients for negative moment at supports. So for the four cases 6,8,5 and 7, there are only 3 coefficients. The fourth one is zero because these cases have a pair of opposite edges discontinuous.
In the last case 9, both the pairs of opposite edges are discontinuous. there will not be a negative moment at any of the four supports. So there are only two coefficients. So in general, the total number of coefficients can be calculated as:
4 cases x 4 coefficients = 16
4 cases x 3 coefficients = 12
1 case x 2 coefficients  = 2
Total                          = 30
This is less than 36. It may be noted that all the cases 6,8,5 and 7, having opposite edges discontinuous, belong to the floor plans 2 and 3 in fig.17.22
So we have seen the method for determining the bending moments. In the next section, we will discuss about the arrangement of bars in the two way slabs.

PREVIOUS      CONTENTS        NEXT

  
             Copyright ©2015 limitstatelessons.blogspot.com - All Rights Reserved
Chapter 17 (cont..8)-Layout of bars in restrained two way slabs

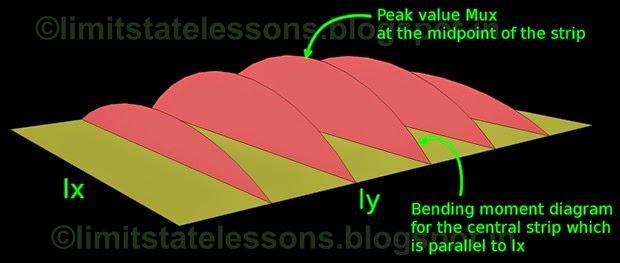
In this section we will discuss about the arrangement of bars in the slab. Consider the fig.17.25 given below. It shows the bending moment diagrams in a two-way slab. This two-way slab that we are considering, is simply supported on all the four sides. The bending moment diagrams are shown in red color. The middle diagram is taller than the rest. This is the diagram for the middle strip. On either side of this strip, the diagrams are smaller, indicating that the strips on either side are carrying lesser bending moments. (If it was a one-way slab, all the diagrams would have been of the same height)
Fig.17.25
Bending moment diagrams for various strips in a two way slab
Bending moment diagram for each strip in a two way slab will be different from that of the adjacent strip.
When we design the reinforcements, we provide steel for resisting Mu,x. This Mu,x, calculated using the coefficients from Table 26, is the maximum value at the middle of the middle strip. This value is indicated by the peak value in the above fig.17.25. But this value progressively becomes lesser as we move from the center towards the shorter sides. This is shown in the fig.17.26 given below:
Fig.17.26
Variation of peak value of Mu,x
The peak value of bending moment progressively decreases as we move away from the center
The progressive reduction in the value of Mu,x is indicated by the green coloured graph. So the requirement of steel decreases as we move away from the center. At greater distances from the center, Mu,x may fall to such a low value that the steel required to resist this low value is less than even the minimum steel required for a slab. Obviously such low quantity of steel cannot be allowed to be provided. In the above fig.17.26, such regions are shown in yellow color. They are situated at a greater distance from the center. Also, at the middle regions where greater steel is required, it is not convenient to vary the spacing of bars from place to place, just to conform with the variation of Mu,x.
So we divide the slab into three segments. A larger middle portion AB and two smaller portions AD and BE on the sides. The diameter and spacing required to resist the maximum bending moment Mu,x is provided on the entire blue region AB. The yellow regions are provided with the minimum steel that is generally required for a slab. The measurements required for dividing the slab into these three strips is given by Cl. D-1 (fig.25) of the code. This is shown in the fig.17.27 below:
Fig.17.27
Division of slab area into three strips in the X direction
For the layout of bars, the slab area is divided into three strips.
We can see that the middle strip (coloured in blue) has a width of 3/4 ly. The two strips on the sides (coloured in yellow) have a width of 1/8 ly. (1/8 + 3/4 + 1/8 = 1). For the whole width of the middle strip, the same diameter and spacing required for Mu,x should be provided. In the yellow portions, same diameter should be provided, but the spacing should be calculated using another method:
• Calculate the minimum steel required for slab. We know that this area should not be less than 0.0012Ag if Fe 415 steel is used, and 0.0015Ag if Fe 250 steel is used. This area is specified for unit width. So Ag = 1000 mm x D. Where D is the total depth of the slab. Details can be seen here.
• Calculate the spacing required from this minimum area.
We made the above discussion based on fig.17.25 which show the bending moment diagrams for simply supported two-way slabs. The bending moment diagrams for continuous two-way slabs are also similar. They will have hogging moments at the supports. The variation of sagging moment Mu,x+ at midspan and Mu,x- at the supports is similar to that shown in fig.17.26. They will be maximum at midspan regions, and minimum near the shorter supports. So the division of slab area into three strips is applicable to continuous two-way slabs also.
The bars in the blue strip in fig.27 are to be provided parallel to lx. These bars extend from one long support to the other. But all the bars need not extend to the supports. Some of them can be curtailed. The distance at which bars can be curtailed are given in cl.D-1.4 of the code. According to this clause, the bars should extend upto a distance of 0.15lx from a simply supported edge and 0.25lx from a continuous edge. This is shown in the fig.12.28 below:
Fig.12.28
Layout of bottom bars in middle strip in X direction
Layout of bars in middle strip in x direction of a restrained two way slab. 
Technically, it is sufficient to show two bars belonging to a particular set of bars, in a drawing. But if more bars are shown, a definite pattern and symmetry in the arrangement of bars will become more clear. So 5 bottom bars are shown in the fig.12.28 above. We can see that all the bars which do not reach the continuous support has the same length, and all the bars which do not reach the simply supported edge has the same length. This is true for both the X and Y directions.
We have seen all the bottom bars in the X direction. The diameter and spacing for these bars are calculated from Mu,x+, and are laid parallel to lx. Also, they are laid as the bottom most layer.
Now we will see the bottom bars in the Y direction. Each of the above four figs. from fig.17.25 to 17.28 have a corresponding fig. in the Y direction. They are shown below from fig.17.29 to 17.32. They do not require much explanation, as they are similar to those in the X direction.
Fig.17.29
Bending moment diagrams in the Y direction for various strips in a two way slab
Fig.17.30
Variation of peak value of Mu,y
Fig.17.31
Division of slab area into three strips in the Y direction
Fig.17.32
Layout of bottom bars in middle strip in Y direction
chap_17_restrained_y_bottom_bars_new1

In the Y direction also we have two yellow strips. Just as in the X direction, we must provide the diameter and spacing required for the minimum steel in these yellow strips also. These bars are laid parallel to ly.
This completes the details of the bottom bars in the Y direction. The diameter and spacing for these bars are calculated from Mu,y+, and are laid parallel to ly. Also, they are laid just above the bottom most layer mentioned in fig.12.28.
So we have seen all the bottom bars in the two directions X and Y. They were shown separately in the above figs. just for clarity. In an actual problem, they must be shown in a single fig.
In the next section we will discuss about the top bars.

PREVIOUS      CONTENTS       NEXT

  
             Copyright ©2015 limitstatelessons.blogspot.com - All Rights Reserved