Showing posts with label bent up bars. Show all posts

Monday, January 25, 2016

Chapter 15.13 - Curtailment of Bent-up bars

In the previous section we saw the anchorage requirements of bent-up bars at simply supported ends and at end supports in frames. In this section we will see the case (iv) and (v) of fig.15.59.

Case (iv): Intermediate supports in continuous beams and slabs

The following fig.15.73 shows such a support.

Fig.15.73
Bent up bar at continuous support
Bent up bars can be used to resist hogging moments at intermediate supports in continuous systems. They must be given proper anchorage on both sides.

In the fig.15.67, the bar provided as bottom bar in span BC is bent-up at Q. It then becomes top steel at support C and continues as top steel into the span CD. Now, when the span BC bends downwards due to the applied loads, the bar will experience tension. So it will try to pull out from support C. To prevent this, we know that adequate development length should be provided, and from the discussion that we had about the 'development length of bent-up bars', we can say that the length RST should be greater than or equal to Ld. This will prevent the bar in span BC from pulling out from the support C.

This same bar will experience another tension also: At the support, the beam is bending upwards, so the bar is being pulled from span BC as well as from span CD. So the bar will try to pull into the support C from both sides. That is., from span BC and from span CD.

We will first consider span BC. The portion inside BC has a bent shape. So a bar with a bent shape is preventing the 'pulling into support C'. This situation requires a different method of measurement for Ld. It is shown in the fig. below:

Fig.15.74
Method of measuring Ld when the bent up bar is under hogging moment

From the fig.15.74, we can see that the procedure is simpler. We do not need to mark the point R. The measurement is taken from the bottom bend point Q towards the left side. The available length towards the left of Q should be greater than or equal to Ld. If this is satisfied, the bar will not 'contract' into support C from the span BC.

In a similar way, the bar will try to 'contract' into the support C from span DC also. To prevent this we must provide Ld from the face of the support towards the right side.

Now we will discuss about the performance of the bent-up bar in resisting the hogging moment at the support C. We have seen figs.15.51 and 52 which give the requirements of top bars at an intermediate support in a continuous beam. Fig.15.51 is shown here again for easy comparison.

Fig.15.51
Curtailment of 'straight' top bars


We can see that a bar is curtailed at a distance of La from the theoretical cut-off point. The other bars continue beyond the point of inflection, (two of them will continue even beyond the next support to act as stirrup hangers and also to take part in resisting the hogging moment at the next support. In a general simple case, there will be three bars at the top, and the middle one will be curtailed. If the hogging moment is of a larger magnitude, more than three bars will have to be provided in layers). Here we concentrate our attention on the bar which is cut-off at a distance La from the theoretical cut-off point. This actual cut-off point is close to the support. We can think of using a bent-up bar in the place of this bar. This is shown in the fig.15.75 below:

Fig.15.75
Bent up bar in place of curtailed bar at top of continuous support


From the fig., we can see that the horizontal portion ST can be extended to the desired point in the right side of support C. But it is not possible to do so in the left side, and thus it may not have the required length in the left side. So the bar will perform well on the right side of the support C. And any contribution that it makes to resist the hogging moment on the left side of C should be ignored. But this arrangement will create a sort of asymmetry because, on the right of support C, three bars (two stirrup hangers and one bent-up bar) are available, while on the left side, only the two stirrup hangers are available to take up the hogging moment. This is solved by bringing in the bent-up bar of span CD as top bar into span BC as shown in the fig. below:

Fig.15.76
Bent up bar at a support from adjacent spans

In the above fig., the two bars are shown at different levels only for clarity. In the actual beam, they are provided at the same level as indicated by the ‘0 mm’ clearance between the bars.

Now we will see the curtailment requirements when bent-up bars are provided. Earlier we have seen fig.15.51 (shown again above) which showed the curtailment details when straight bars are used. This fig. is based on the cl.26.2.3.4 of the code. The same requirements apply here also. So we can draw a fig. for bent-up bars by making suitable modifications to fig.15.47. This is given in fig.15.77 below:

Fig.15.77
Curtailment of top bars at an intermediate support when bent up bars are used
When bent up bars are used to resist hogging or negative moments at supports, they must be given required areas.

We can see that the bent-up bar from span CD is not included in the calculation of Ast1. This is because, it's top horizontal portion does not have the required length inside span CD. So it's contribution cannot be taken into account in span CD. But it's contribution can be taken into account in the span BC.

So we have completed case (iv) of fig.15.59. The next case (v) is similar to case (iv). To show a final diagram showing the curtailment details, all we need to do is to change the support condition in the above fig.15.77. This is shown below:

Fig.15.78
Bent up bars at the intermediate supports of a frame


So we have seen the final case (v) also of fig.15.59. It may be noted that for the cases (iii), (iv) and(v), Moment envelope should be used instead of Bending moment diagram where ever applicable.

Shape of Bent-up bars


We have seen the usage of bent-up bars in various situations. Now we will see an important aspect that we have to consider in the 'actual making' of a bent-up bar. In the figs. that we saw above, the bends are all shown as ‘sharp’, as in the fig. below:

Fig.15.79
Sharp bends shown in illustrations

But this is used only for illustration purpose. In an actual beam, such sharp bends should be avoided. This can be achieved by introducing curved portions in between straight segments as shown in the fig. below:

Fig.15.80
Actual method for forming a bent-up bar

Each of the curved portions at the top and bottom bend points is a part of a perfect ring having inner radius r and outer radius r + Φ. More details about the formation of such bent bars are given in IS 2502-1963: Code of practice for bending and fixing of bars for concrete reinforcement.

So we have completed the discussion about bent-up bars. In the next section, we will see the method of curtailment when the continuous members are designed using moment coefficients.

PREVIOUS       CONTENTS       NEXT                                          


Copyright©2016 limitstatelessons.blogspot.com - All Rights Reserved

Chapter 15.12 - Anchorage for Bent-up bars at supports

In the previous section we saw the compilation of the various requirements for the curtailment of Top and Bottom bars. In all those cases, we have used 'straight bars'. In this section we will see the use of 'bent-up' bars.

We have seen that some of the tensile bars can be curtailed at sections beyond which they are no longer required (after giving the required extensions). Instead of curtailing them at those sections, they can be bend upwards. The angle of bend is usually 45 to 60 degrees. After bending, these bars continue upwards up to the top face of the beam. (the required concrete cover should be provided at the top face). At the top face, these bars are given a bend once again so that they become horizontal again. After becoming horizontal, they continue towards the support.

The bending up of the bars is done near the supports. So we will discuss it at the same five cases that we saw earlier in fig.15.59 in the previous section.

In the first three cases, the bent up bars will not have space for required extension. So they must be given a standard 90o bend, so as to obtain the required Ld. In the last two cases, required space will be available for extension. So when they are extended, they will have enough length to contribute towards 'serving as a part of the negative top steel' required at the support. We will discuss each of the cases in detail.

Case (i) Simply supported ends: We know that a bar should be extended beyond the theoretical cut-off point by distance greater than or equal to La. We discussed this based on fig.15.25 to 27. Based on that, we must begin the sloping portion of the bar only at a distance of La from the theoretical cut-off point. But, when we provide a bent-up bar, it will intercept the diagonal crack. as shown in the fig.15.62 below:

Fig.15.62
Bent-up bar intercepting the crack
Bent-up bars intercept the cracks effectively, and prevents their development.

Because of this type of interception, the bent-up bars contribute towards reducing the spread of diagonal cracks. [This type of a contribution is not obtained from straight bars]. So we need not extend the bar to a distance of full La before beginning the sloping portion. According to cl.8.3 (b) of SP 34, for extension purpose, the bent-up bar may be considered to be effective up to the point where the bar crosses half of the effective depth of the beam. 

This can be explained as follows:
The bent-up bar originally travels through the bottom side of the beam. This is at the midspan region.  Near the support region, it is bent upwards. Once it is bent, the bar is no longer available at the bottom side. So we are tempted to think in this way:
• a bottom straight bar no longer contributes any thing at the bottom side after the cut-off point. 
• in the same way, the bent-up bar no longer contributes any thing at the bottom side, after the point of bent-up. 

Based on this, we will want to bring the point of bend up to the beginning of the crack as shown in the fig.15.63(b) below:

Fig.15.63
Extension for bent-up bar

Fig.(a) shows the original point r of the bent-up. But as we are required to provide an extension of La, the point of bent up is given at q as shown in the fig.(b). But this is not required. The tension in the bent-up bar is effective to resist the 'external applied moment Mu,x' shown in fig.15.26, even after the point of bent-up. Now the question arises: For how much 'more distance' is it effective? The answer is given by the above mentioned cl.8.3(b) of SP 34. 

Imagine a horizontal plane through half the effective depth of the beam. Any bent-up bar in that beam will have a point of intersection with the plane. This point of intersection will be in the 'sloping portion'. According to the clause, the tension in the bar at this point of intersection is effective in resisting Mu,x.  Based on this information, we can calculate the required extension. The calculations are based on fig.15.64 below:

Fig.15.64
Calculation of extension

The point of intersection between the bent-up bar and the horizontal plane through d/2 is our 'point of interest'. We want that point to be at the beginning of the crack. The above fig. shows exactly that. q' is the point of intersection, and it is on section YY which passes through the beginning of the crack. To this finalised position, we can add two triangles stq and str. With the help of those triangles, we calculate the required extension.

• sr is original position of the bent-up bar.
• tanα = st⁄tr = (d/2)⁄tr  . So tr = d/2 cotα.
• Similarly tanθ = st⁄qt = (d/2)⁄qt  . So qt = d/2 cotθ.

If we assume that the diagonal crack occurs at an angle θ = 45o and the bent up is also done at an angle of α = 45o, then we will get tr = qt = d/2.  (∵ tan45 = cot45 = 1). So, if we extend the horizontal portion of the bar beyond the section XX by a distance d⁄2 , and thus start the sloping portion from the point t, the point s will move horizontally to q’. So we can conclude that the additional extension that has to be given beyond the theoretical point of bent-up is La = tr = d ⁄2.

Now we will discuss about the development length requirements of bent-up bars. The fig.15.65 below shows a bent-up bar PQRSTU , provided in a beam.

Fig.15.65
Development length for bent up bar

The bend is given at Q. So the sloping portion begins at Q , and the angle of the bend is shown as α . [Bend can be given at Q only if the bar is no longer required to take up any sagging moment, and La =d/2 is given]. But from the discussion that we had based on fig.15.50, development length Ld should be provided on both sides of Q. As the portion on the left side of Q is having a sloping shape, we need a standard method to measure Ld on a sloping portion. 

This method is shown in the above fig.15.65 and can be explained as follows: The point R is marked on the bar. It is the point of intersection of the bar with a horizontal plane through d/2. The length available from R to the end of the bar is measured. This length should be greater than or equal to Ld . If at an end support, enough space is not available, then a standard 90o bend can be given at T. 

If the point Q is a little more away from the support, it may be possible to avoid the 90o bend. This is shown in the fig.15.66 below:

Fig.15.66
Development length of bent up bar with out standard 90o bend at the end

For the bar B in the above fig., the point Q at which the sloping portion begins, is further away from the support. So there is enough space to extend the bar, and a 90o bend can be avoided at the end.

As we are discussing about the bent-up bars at this stage, it will be better if we look at the performance of these bars as 'top bars' also. The above figs.15.65 and 15.66 can be used for this purpose. Earlier, we saw the method of providing top bars at a simple support of a beam using 'straight bars'. We discussed it based on fig.15.58 in the previous section. There we saw the quantity of bars to be provided. Now, in our present case, looking at the above fig.15.65, we can say that the portion STU can take part in resisting the hogging moment at the support. But we must consider the length of the horizontal portion ST. This length depends on the position of Q, and angle α. So it may not be always possible to get a sufficient length for ST to resist the hogging moment. Because of this, it is better to ignore any contribution made by the bent-up bar towards resisting the hogging moment at a simple support of a beam. Instead, we must use the two stirrup hanger bars to satisfy this requirement. The hanger bars should be given required anchorage at supports.

Now let us look at the Bar B in fig.15.66. This bar cannot make any contribution towards resisting the hogging moment because it is not anchored into the support. Even if we decide to extend it and give the required anchorage within the support, the horizontal length at the top may not be sufficient always. So in this case also, we must ignore any contribution made by the Bar B towards resisting the hogging moment at a simple support of a beam. Instead, we must use the two stirrup hanger bars to satisfy this requirement. But these bent-up bars perform well as a bottom bars to resist the sagging moment, and also assists in resisting the diagonal tension crack.

In the case of slabs, it may be possible to use the bent-up bars. Earlier we saw the provision of straight bars as top bars at the supports in fig.15.57. For bent-up bars, this fig. can be modified as shown in fig.15.67 below:

Fig.15.67
Bent up bar for slab

In the above fig., it is shown that:
The distance between the top bend point of the bar and the face of the support should be greater than or equal to 0.1l. (15.7)
So, after fixing up the bottom bend point, we will be able to determine the position of the top bend point, and at that stage, we must check whether condition 15.7 given above can be satisfied. If it can be satisfied, we can bend up the alternate bars of the slab and satisfy the area requirements also as shown in fig.15.67.

So we have completed the discussion about the performance of the bent-up bars as top bars at 'simple supports'. We have seen case (i). The same procedure can be adopted for [case (ii) of fig.15.59. The simply supported end of continuous members] also when bent-up bars are considered.


Case (iii) End support of multi span continuous beams which are part of frames:
In this discussion, we will see the details of the performance of bent-up bars at the end support of a frame. In the previous two cases, we were dealing with simple supports. There, hogging moment is zero. So there was not much calculations to be done. But here there will be a hogging moment that has to be considered. First let us see how the bent-up bar will perform as a bottom bar at such a support.

Fig.15.68
Bent up bars at the end support in a frame

The above fig.15.68 shows a bent-up bar provided in a beam which is framing into an end column of a frame. As usual, first, the point Q is determined by extending d/2 from the theoretical point of bend. Then the length RSTU is measured. This length should be greater than or equal to Ld. Then only the bar can effectively perform as a bottom bar and take part in resisting the sagging moment along with other bottom bars.

Now we will see it's performance as a top bar. We have seen figs.15.55 and 56 which give the requirements of top bars at the end support in a frame. Fig.15.55 is shown here again for easy comparison:

Fig.15.55 
Curtailment of 'straight' top bars (end support in framed structures)

We can see that one bar is curtailed at a distance of La from the theoretical cut-off point. The other bars continue beyond the point of inflection. (two of them, not shown in the fig., will continue even beyond the next support to act as stirrup hangers and also to take part in resisting the hogging moment at that support). Here we concentrate our attention on the bar which is cut-off at a distance La from the theoretical cut-off point. This actual cut-off point is close to the support. We can think of using a bent-up bar in the place of this bar. This is shown in the fig. below:

Fig.15.69
Bent up bar in the place of a curtailed bar at top

In the above fig., the horizontal portion TS is reaching not even up to the theoretical cut-off point. The point S should have reached up to a distance La beyond the theoretical cut-off point. Because of this shortage of length, this bent-up bar in the above fig.15.63 cannot be considered to be a member of the ‘bar group which resists the hogging moment’. That is., any contribution that this bar makes towards resisting the hogging moment should be ignored, and other extra straight bars should be provided. We could take the contribution into account if the bar had the shape as shown in the fig.15.70 below:

Fig.15.70
Required shape of the bent up bar

In the fig.15.64, the point S is beyond a distance La from the theoretical cut-off point. The bar should also have a length greater than or equal to Ld embedded within the column. So this shape satisfies the length requirements. But it should be noted that it is the 'position of point Q' that we fix up first from sagging moment considerations. The position of S depends upon the position of Q. If it is required that Q is to be a little more to the left, the above ‘ideal shape’ will not be obtained.
If length requirements are satisfied, we must then look into the area requirements. This requirement is same as that for straight bars shown in fig.15.55. Based on that fig., we can prepare another fig. for a beam having a bent-up bar as shown in the fig.15.71 below:

Fig.15.71
Area requirements when bent up bar is used

It should be noted that when the bent-up bar makes contribution as both bottom bar and top bar as in fig.15.71 above, the development length requirements for the sagging portion should also be satisfied according to fig.15.65 shown earlier in this section. But it can be seen that this requirement will be naturally satisfied if the required Ld is provided within the column as shown in the fig.15.65.

It should also be noted that if the ‘ideal shape’ cannot be obtained for the bent-up bar, it’s presence should be ignored from the point of view of top bars. This situation is shown in the fig.15.72 below:

Fig.15.72
Bent-up bar with insufficient length at top

In the fig., it can be seen that the bent-up bar is not included in calculating Ast1. Extra ‘straight bar’ is provided to obtain this area of Ast1.

So we have completed the discussion on case (iii) when bent-up bars are considered.  In the next section, we will discuss about (iv) and (v).

PREVIOUS       CONTENTS       NEXT                                          


Copyright©2016 limitstatelessons.blogspot.com - All Rights Reserved

Friday, November 13, 2015

Chapter 13 (cont..6) - Shear stress in a Reinforced concrete beam

In the previous section we saw 'vertical shear reinforcements'. Now we will see 'Inclined shear reinforcements'.

Fig.13.29
Inclined shear reinforcement
Stirrups may be provided in an inclined direction so that the shear cracks will be intercepted at right angles.

The inclined stirrups should be placed in such a way that they intercept the cracks nearly at right angles. Such an arrangement will resist the widening and propagation of the cracks. These stirrups are usually inclined at 45o with the main bars of the beam. An angle less than 45o is not recommended because they may slip along the longitudinal bars of the beam.

Inclined stirrups are most effective in reducing the width of the inclined cracks. In cases were beams are subjected to high axial tensile forces, there will be formation of transverse cracks which will extend to the full depth of the beam. Also such cracks will be perpendicular to the beam axis. So the inclined stirrups will effectively intercept those cracks.

But in the case of beams subjected to seismic loads, the direction of shear force may get reversed. In such beams, the inclined stirrups will be entirely ineffective. For such beams, special provisions for shear design should be made. We will discuss about it in a later chapter.

Next we see the bent-up bars

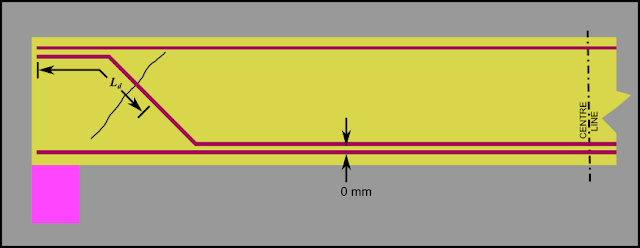
Fig.13.30
Shear reinforcement using bent-up bars

This is provided by bending up one or two main bars. In the above fig, the bent-up bar is shown separately from the main tensile steel only for clarity. The vertical distance between the bottom most surface of the bent-up bar and that of the other main tensile steel is shown to be 0 mm. This indicates that both the bars belong to the same layer.

Just as in the case of inclined stirrups, the direction of bent-up should be in such a way that they intercept the crack nearly at right angles. Also the bar should be properly anchored. That is., the length of this bent-up bar, beyond the midpoint of the inclined portion should not be less than the ‘development length’  of the bar. This is shown in the fig.13.31 given below. We will learn about development length in later chapters.

Fig.13.31
Development length for bent-up bar

In the design process of a beam, first we determine the main tensile bars required to resist the bending moment. Out of these bars, we bent one or two to resist shear near the supports. The bars at the bottom corners are not bent. They remain 'straight', and are extended from support to support to anchor the stirrups properly. It can also be seen that beyond the bottom point of bent, the bent-up bar is no longer available at the tension zone of the beam. In general, this does not cause a problem because nearer the supports, the Bending moment (sagging type) is of a lesser magnitude, and so all the bars will not be required there. However in every design process, it is important to ensure that the bent-up bars are no longer required beyond the point of the bent, and that development length requirements are satisfied.

We have to consider another point while using bent-up bars for shear reinforcement. That is., the design should not be in such a way that all the design shear load is resisted by the bent-up bars alone. We must provide stirrups also. Cl.40.4 of the code specifies that 'Where bent-up bars are provided, their contribution towards shear resistance shall not be more than half that of the total shear reinforcement.' For example, if a factored shear force of 30 kN has to be resisted at a section, all the bent-up bars at the section together should provide a resistance of 15 kN only. If the bent-up bars given is capable of giving a resistance greater than 15 kN, the stirrups provided at the section should also be capable of giving a resistance equal to or greater than 15 kN.

Now that we have seen the various methods of providing shear reinforcement, we will now discuss the procedure to design them.

For designing the reinforcements, first we have to determine how much shear stress will have to be resisted at a given section in a given beam. We have seen that the stress which causes the crack near the support at the NA is equal to the shear stress q at the section. (Details here) So now we revisit fig.13.5. There we saw that the shear stress follows a parabolic distribution, and that the peak point of the parabola is at the NA. In the strength of materials lessons, we have learnt that this maximum value is given by:
Eq.13.11:

This is the maximum value at a single layer, which is the Neutral layer. At other points the values are different. Also, the actual distribution in a reinforced concrete beam section is quite complex due to the presence of steel reinforcements. So the code assumes a uniform stress across the section, and it’s value is given by:
Eq.13.12:
Uniform shear stress in a reinforced concrete beam section

• V =Shear force at the section, • b =width of the section, and • d =effective depth of the beam. This can be represented by the following fig.13.32:


Fig.13.32

Comparison of shear stresses


So now we are leaving the 'homogeneous sections', and concentrating completely on 'R.C.C sections' in our discussions on shear design. So from here onwards we will use the notations given in the code, and thus the greek symbol ‘τ’ will be used instead of  ‘q’ to represent the shear stress. Thus:
Eq.13.13:


When we learned about the behaviour of the beam in flexure (bending), we used the terms such as:
• Bending moment M calculated using the characteristic loads,
• Factored bending moment Mu calculated using factored loads, and
• Ultimate moment of resistance MuR of the section.
In similar lines, for the behaviour of beam in shear we can define V, Vu , and VuR
• V is the shear force at the section due to the characteristic loads applied on the beam.
• We multiply V  by the appropriate factor to get the factored shear force Vu. 
• We must design the section in such a way that the ultimate shear resistance VuR offered by the section is greater than Vu.

Based on the above Eq.13.13, the shear stress at the point of impending failure, denoted as τv  is given by:

Eq.13.14 is given in Cl.40.1 of the code. So now we know the shear stress for which we have to make the design. Before proceeding into the design steps, we shall derive a modified form of the above equation, to be used in case of beams of varying depth. We will do this in the next section.


NEXT                                          

Copyright ©2014 limitstatelessons.blogspot.com - All Rights Reserved